
How to work with Data Projects
Easy
Data Projects are a set of plain-text files (Datafiles) with a simple syntax and a folder structure.
A file with .datasource extension represents a Tinybird Data Source, and the simplest version contains the schema definition like this:
SCHEMA >
    timestamp DateTime,
    product String,
    user_id String,
    action String
    json String
A file with .pipe extension represents a Tinybird Pipe, and the simplest version contains a node and SQL query like this:
NODE only_buy_events
SQL >
    SELECT
        toDate(timestamp) date,
        product,
        JSONExtractFloat(json, 'price') AS price
    FROM events
    WHERE action = 'buy'
Both are Datafiles, one represents how data is stored and the other how it’s processed (and published as an API).
Every other Tinybird resource has a Datafile representation. You can check the whole Datafile reference in the CLI documentation.
You can scaffold a Tinybird Data Project with the tb init CLI command, it will create the following folder structure:
tb init

** - /datasources created
** - /datasources/fixtures created
** - /endpoints created
** - /pipes created
** - /tests created
** - /scripts created
** - /deploy created
** '.tinyenv' created
** 'scripts/exec_test.sh' created
Alternatively you can use tb pull --auto --force from an existing Workspace to download all resources to a local Data Project.
datasources: Where you put your
.datasourcefilesdatasources/fixtures: Place as many CSV or NDJSON files that will be pushed when using the
--fixturesflag from the CLI. They need to share name with a.datasourcefile.endpoints: You can use this folder to create a logical separation between non-Endpoint Pipes and Endpoint Pipes, though it is not necessary. By default, all
.pipefiles will be placed in thepipes/directory when pulled from the server.pipes: Where you put your
.pipefilestests: Where you put data quality and fixture tests
scripts: Useful scripts for common operations like data migrations, fixtures tests, etc.
deploy: Custom deployment shell scripts
.tinyenv: Global variables for the Data Project, for instance the
VERSION
How to organize your Data Projects
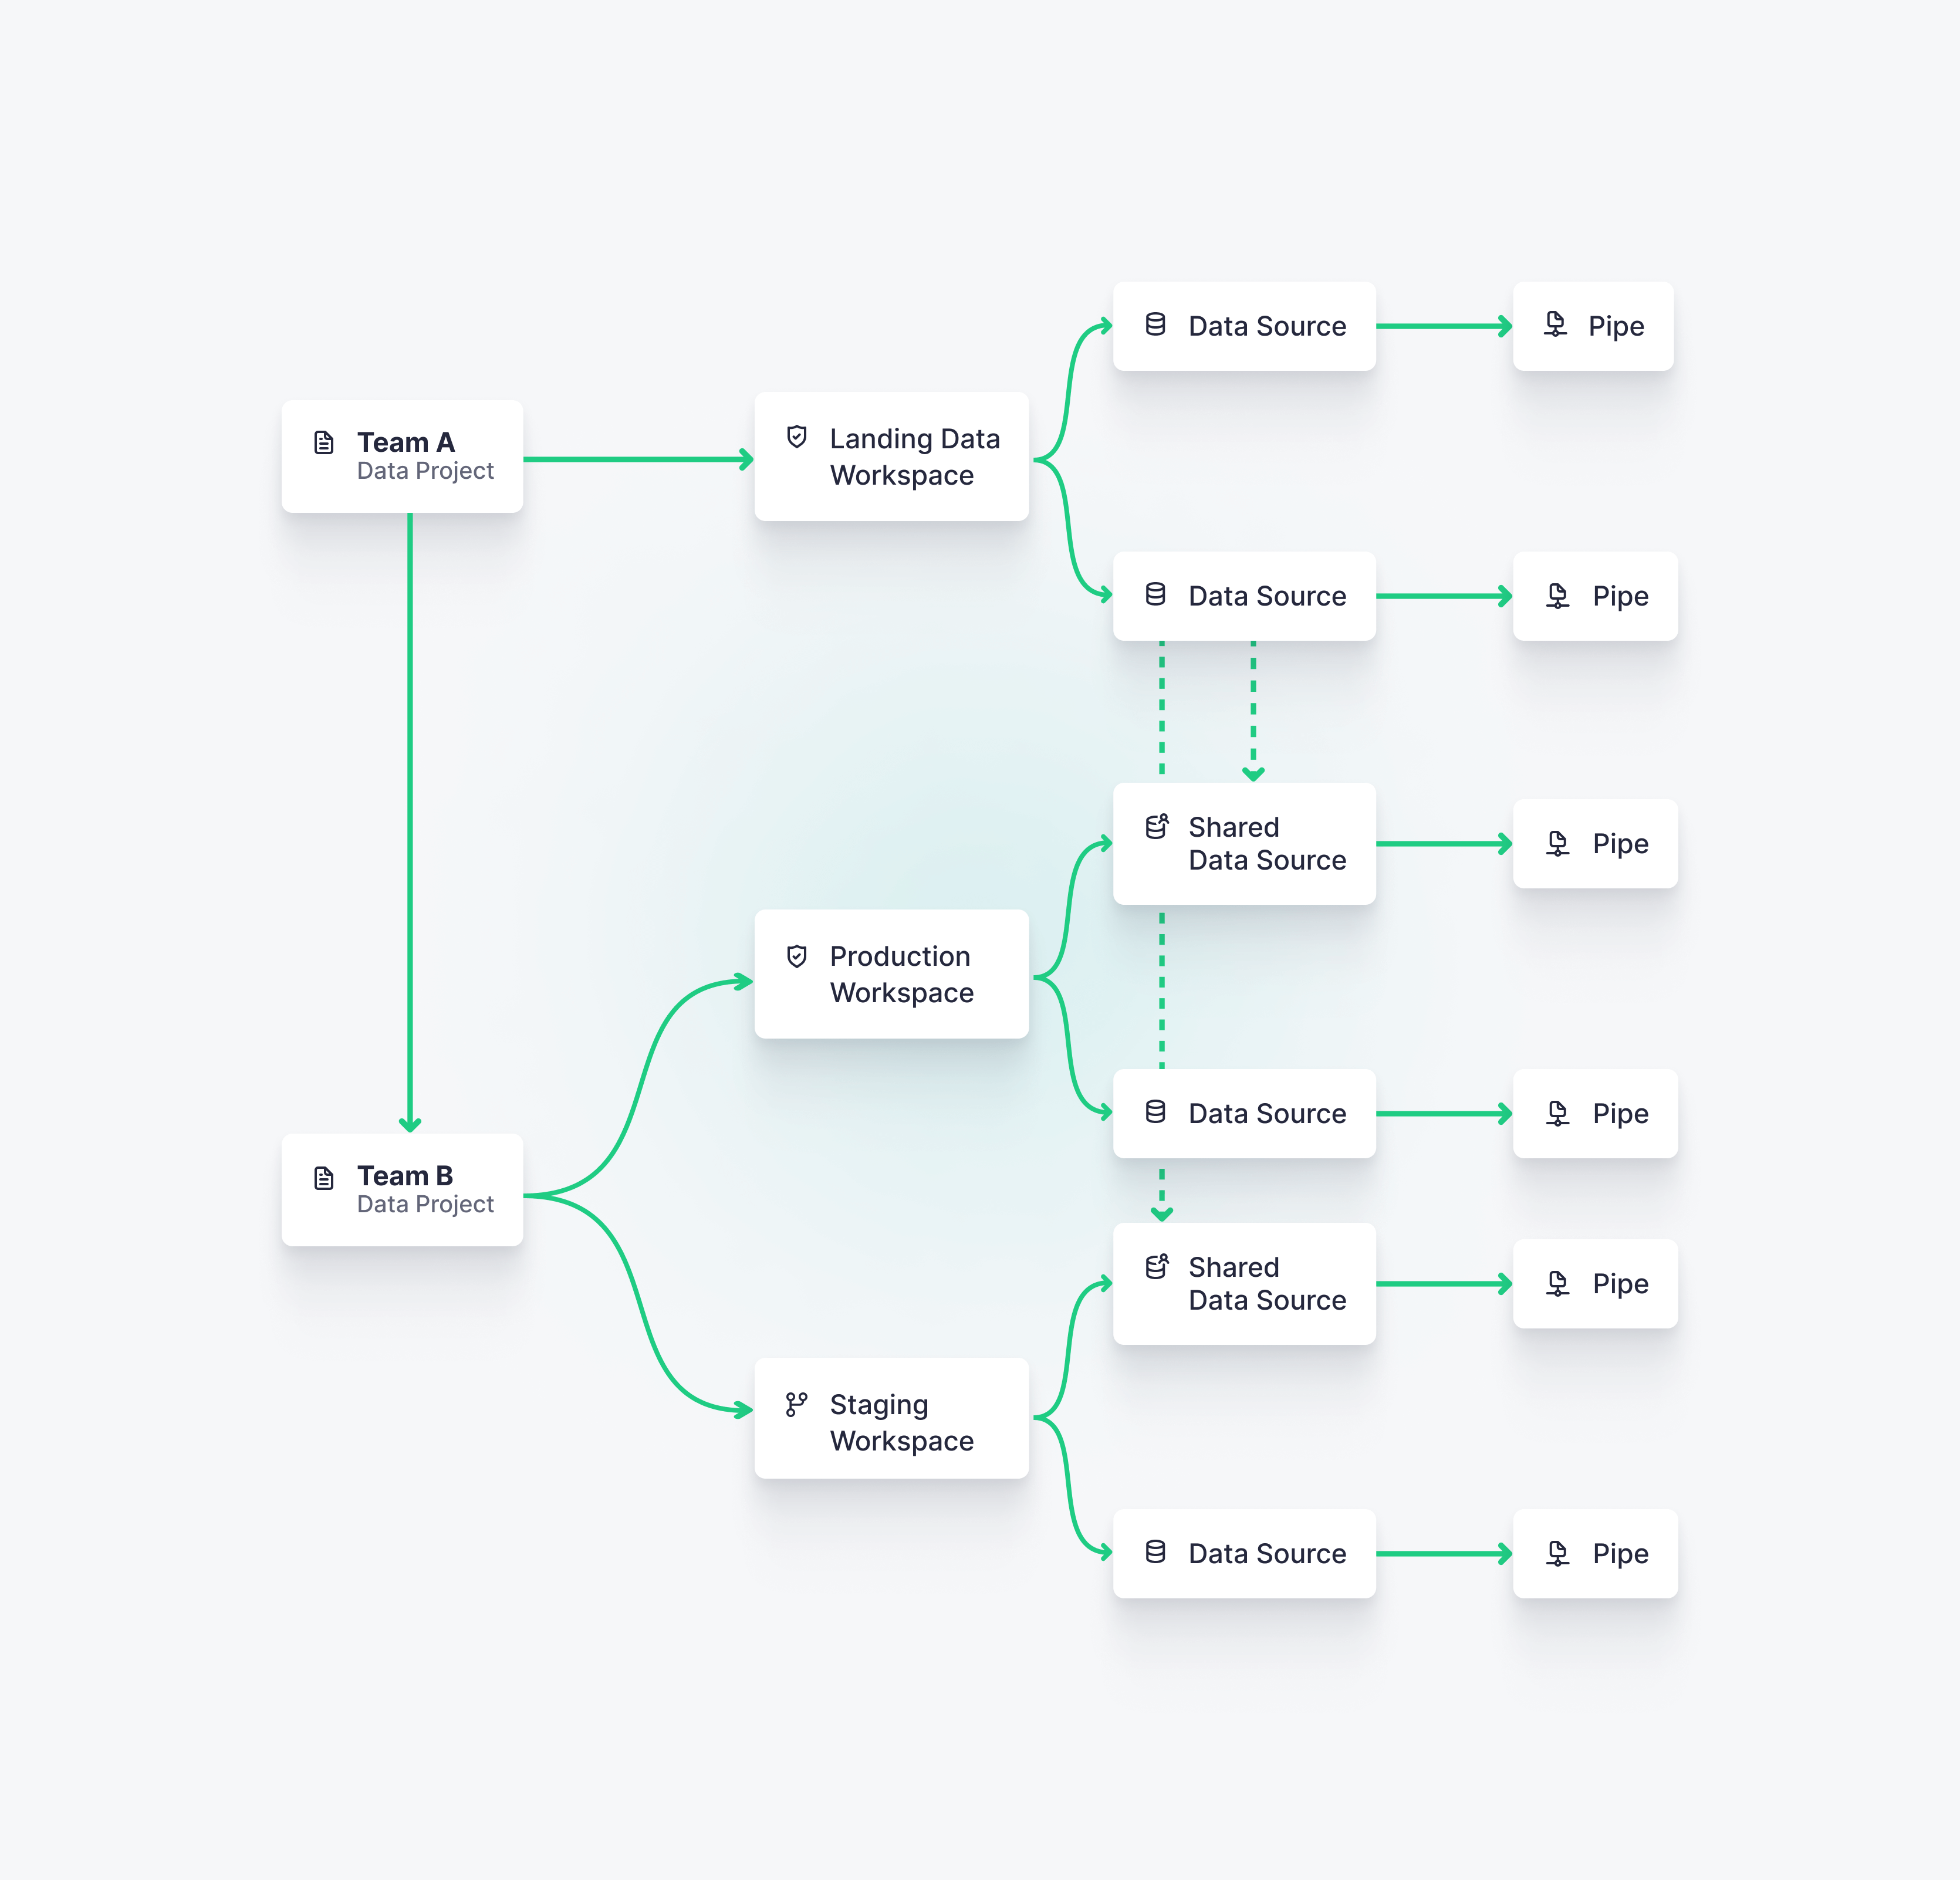
The same Data Project can be deployed in different Workspaces using different data (production, staging, etc.). However, you should not have several Data Projects for one Workspace.
Organize your Data Project depending on your team and project structures. You can easily share Data Sources from one Data Project to another.
The most common ways to organize Data Projects are:
One Data Project deployed in one Workspace.
One Data Project deployed in multiple Workspace, for instance, pre-production (or staging) and production Workspaces.
One Data Project containing Data Sources that are shared with other Workspaces for building use cases over them. Each Data Project can be deployed to one or more Workspaces.
From prototyping to production-ready
Use the UI for prototyping, solo-projects, demos, instant feedback on queries, fine tuning, etc. Once a Workspace is in production, you want to move to editing the Datafiles and using Git so that you can iterate your Data Project reliably.
Protect the Main Workspace: This keeps Workspace members from editing Pipes directly from the UI.
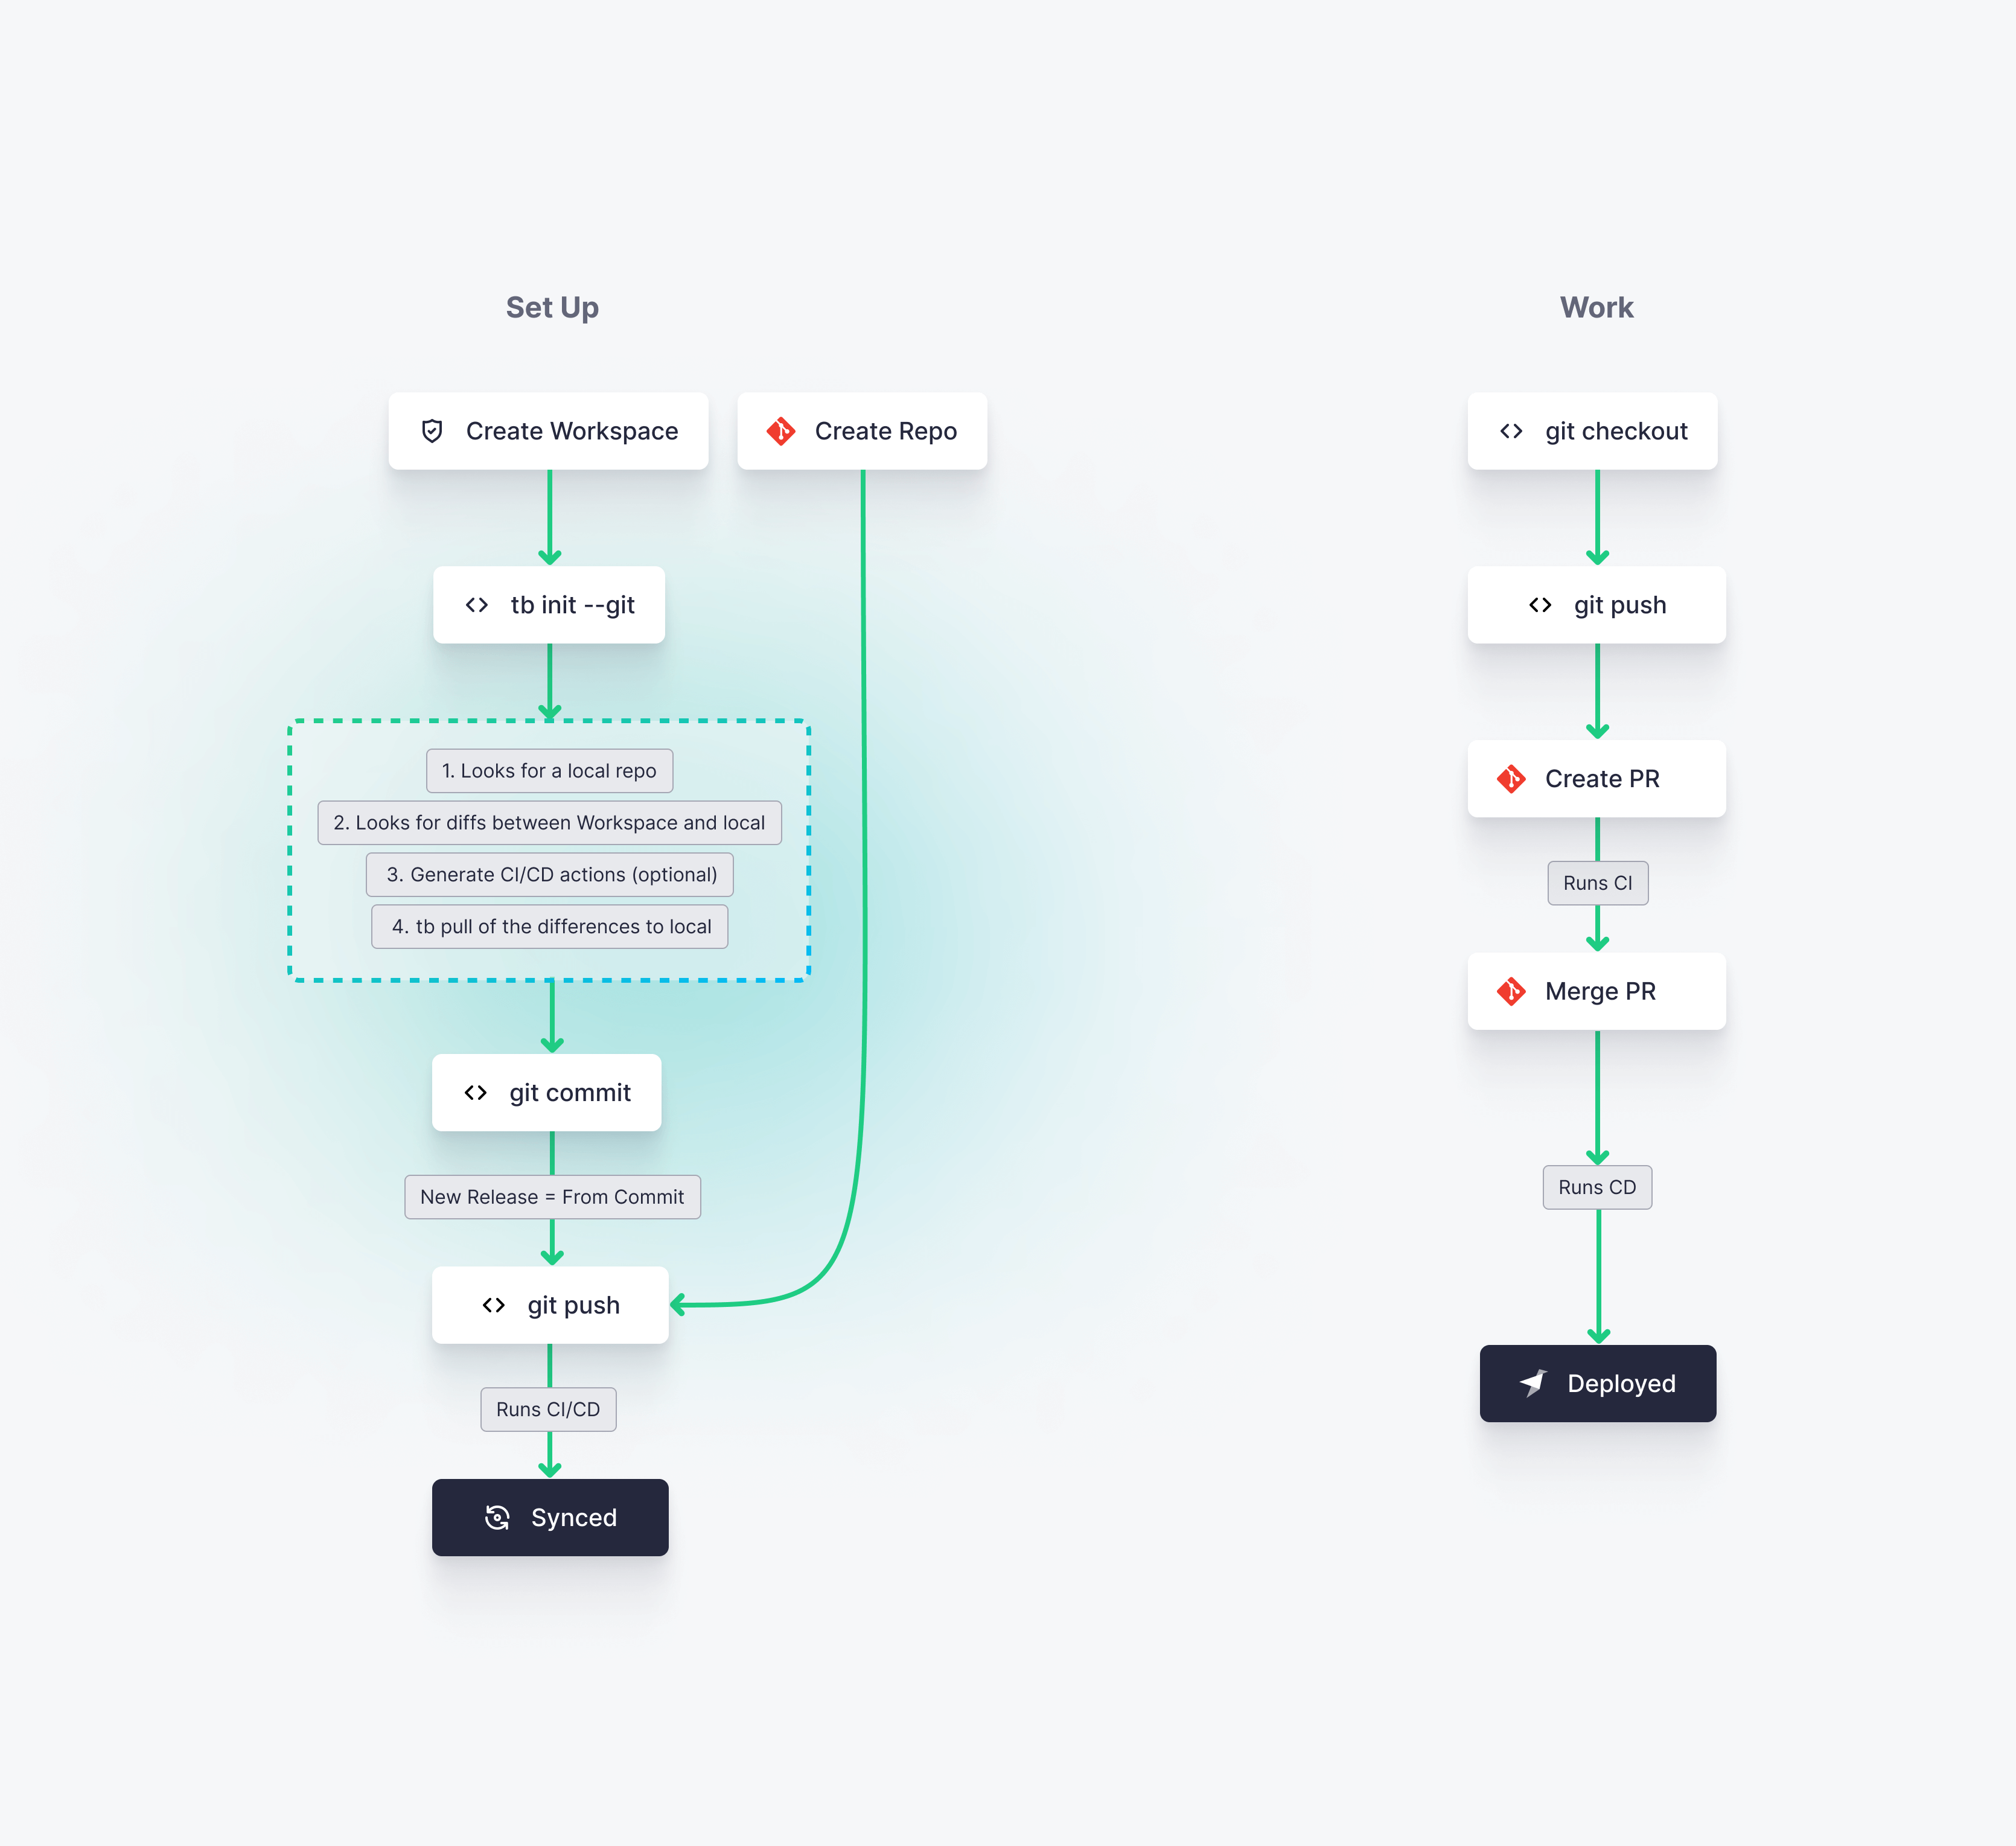
Connect the Main Workspace to Git: The Workspace maintains a reference to the active Git commit. The Datafiles in the Data Project’s Git repository are the single source of truth.
Standardize your Git workflow and Continuous Integration pipeline: Build your CI pipeline and enforce best practices like testing and code reviewing.
Define your release process: Build your CD pipeline depending on how your Data Project is organized. For instance, you can choose to deploy first to a pre-production Workspace, and then to a production Workspace.
We provide some templates for CI/CD pipelines over Data Projects. Read the CI/CD guide to learn more about CI/CD with Tinybird Data Projects.
When to use API vs UI vs CLI
You don’t need to use Tinybird’s API to work with Data Projects.
We recommend that you start from the UI until you become familiar with Tinybird’s main concepts. The UI is perfect to test and debug queries, get instant feedback with data, prototype new ideas, fine tune and debug performance, etc. Use the UI for Workspace administration (manging members, permissions, quotas, etc.). Even when your Main Workspace is protected, you can still use the Playground or Environments to test out and prototype within the UI.
Use the CLI once to link the Data Project with Git. You should continue to use the CLI to manage the state of a Workspace, as the CLI is the glue between the Workspace and the Data Project in Git. The CLI is heavily used in CI/CD pipelines.
Iterating Data Projects
You might be accustomed to working directly in the UI within your production Workspace, but we no longer recommend this. While the UI experience is great for exploring and prototyping new use cases, or even for deploying hotfixes, using the UI on an unprotected Main Environment will cause some problems for you and your team:
The Main Workspace won’t match the Data Project files, eliminating a single source of truth.
You won’t know who made changes, when, why, and how? With Git and a proper workflow you get this for “free”.
Changes won’t be properly tested. You need to use proper CI/CD or Environments to debug and test changes.
Distributed collaboration and version control will be very difficult.
You won’t have a consistent development workflow or Data Product lifecycle.
You want have consistently documented steps necessary to build common use cases.
We are continually improving the experience of iterating Data Projects in Tinybird. Right now, these are the current recommended guidelines:
Playground: Use the Playground for one-off queries on production data and for prototyping new Endpoints. You can download your Playground queries as a
.pipefile and then integrate them into your Data Project and Git workflow.Environments: Use Environments as a part of your CI/CD workflow to test changes without affecting your Main Workspace. You can also create Environments on demand to review new use cases, test new ideas with data, or prototype and assess more complex changes. You can choose a Data Branching strategy to copy some data from the Main Environment for testing or copy only schemas and append data from fixtures later on.
Environments vs Workspaces: Environments are meant to be an ephemeral snapshot of the resources in a specific Workspace, allowing you to test changes made within that Workspace. Workspaces can contain more than one Environment, and are meant for integrating and deploying changes on your production or pre-production data products.
Versioning your Pipes: As a rule of thumb, use the
VERSIONflag for breaking changes to Pipes.Iterating Data Sources: Common strategies to iterate Data Sources and Materialized Views.
Integrate, test and deploy Data Projects
Once you have prototyped a new use case, either in the UI or directly working with Datafiles in the Data Project, you want to integrate those changes. This is how you should do so:
Optionally use the Playground or new Environment to prototype.
Pull or update the Datafiles and consolidate them in your Data Project.
Push to a Git branch and create a Pull Request.
Implement tests over your API endpoints and data.
Merge the branch.